This is what I worked on the for the last 1 year. Very excited that it's now official announced.
Check it out here
Friday, August 26, 2011
Saturday, January 30, 2010
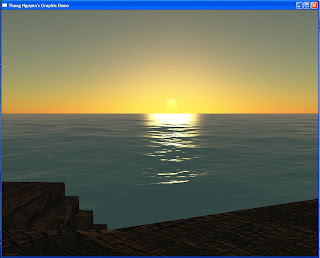
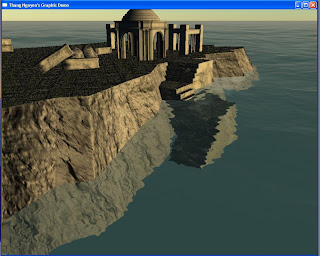
Projected Grid Water
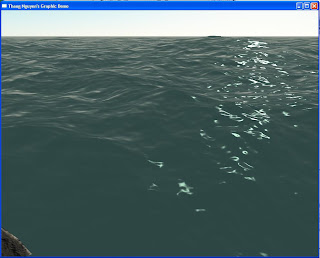
This is the implementation of water using projected grid. It has both refraction and reflection. Also, it gives better detail up close and also has smooth and good water displacement. Noise textures are created and animated to create height map. It allows to simulate various water waves type: from near flat water to large waves ocean. Combine with atmospheric scattering and we have some nice ocean scene. The implementation is based on Claes Johnson's paper.
Some screenshots:
And here is it in action:
- For large view: follow this link
- Watch it here:
* Demo breakdown:
- Deferred shading is used to achieve better and faster rendering than forward rendering. Lighting calculation was done in camera space and optimized using stencil masking.
- Atmospheric scattering was computed based on pre-computed textures: transmittance, irradiance, and inscatter. It has multiple scattering for realistic color.
- Noise textures were created and animated over time. They then were used to create heightmap for the water grid. Heightmap then was used to generate normal map that can be lookup in the shader for water grid.
- Water grid was projected using a 2nd camera with some elevation from the original camera. The 2nd camera projection was built based on the main camera's frustum.
- Sun scattering color was blend with terrain texture to create realistic color with respect to sun position during the day.
- SSAO was added for more realism and give a sense of depth for the scene.
Some screenshots:


And here is it in action:
- For large view: follow this link
- Watch it here:
* Demo breakdown:
- Deferred shading is used to achieve better and faster rendering than forward rendering. Lighting calculation was done in camera space and optimized using stencil masking.
- Atmospheric scattering was computed based on pre-computed textures: transmittance, irradiance, and inscatter. It has multiple scattering for realistic color.
- Noise textures were created and animated over time. They then were used to create heightmap for the water grid. Heightmap then was used to generate normal map that can be lookup in the shader for water grid.
- Water grid was projected using a 2nd camera with some elevation from the original camera. The 2nd camera projection was built based on the main camera's frustum.
- Sun scattering color was blend with terrain texture to create realistic color with respect to sun position during the day.
- SSAO was added for more realism and give a sense of depth for the scene.
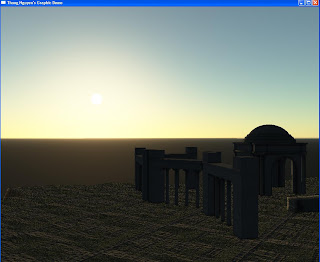
Atmospheric Scattering
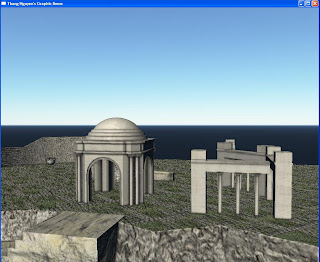
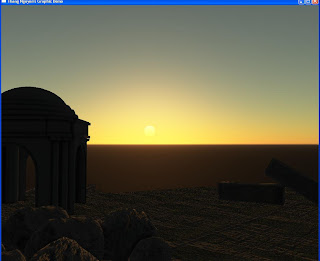
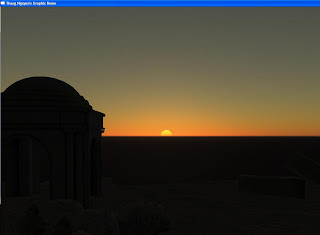
This is the implementation of atmospheric scattering. It has multiple scattering as well as ground scattering for terrain. It is based on the paper of Eric Brunton. Here is a couples of screenshot:
And this is it in action:
- For large view: follow this link
- Watch it here:
* Demo breakdown:
- Deferred shading is used to achieve better and faster rendering than forward rendering. Lighting calculation was done in camera space and optimized using stencil masking.
- Atmospheric scattering was computed based on pre-computed textures: transmittance, irradiance, and inscatter. It has multiple scattering for more realistic color.
- Sun scattering color was blend with terrain texture to create realistic color with respect to sun position during the day.
- SSAO was added for more realism and give a sense of depth for the scene.
SSAO
SSAO has been a standard graphic technique for a while now in almost every games. Therefore, I thought I should put up my implementation of SSAO. This is based on the implementation of Arkano over at Gamedev.net. Thanks for the amazing job Arkano.
A couple of screenshots:


A couple of screenshots:


Tuesday, January 12, 2010
A post after so long!
This is just a post to revive the blog :). In the past few months, I revamped the demo and implemented deferred shading instead of the traditional forward rendering. I also clean up my code and organize them for better readability and maintenance.
Currently I'm working on implementing multiple atmospheric scattering from Eric Brunton's paper. I will post a video soon. Until then, take care.
Currently I'm working on implementing multiple atmospheric scattering from Eric Brunton's paper. I will post a video soon. Until then, take care.
Saturday, July 11, 2009
Big update
This is a big update to my graphic demo. I finished implementing a sun shader, which includes HDR, bloom, and God ray. Please follow this link to watch it in HD:
Sun Shader
I also finish implementing Depth of field (or DOF). Here is a picture:
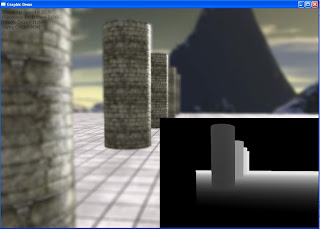
The lower right rectangle shows the depth test for the scene. I'll write about this two effects in details next blog. Take care for now.
Sun Shader
I also finish implementing Depth of field (or DOF). Here is a picture:

The lower right rectangle shows the depth test for the scene. I'll write about this two effects in details next blog. Take care for now.
Thursday, May 7, 2009
Dynamic cube mapping for real reflection / refraction
As mentioned in previous post, I was working on how to create a true reflection / refraction model. Initially I try to use dual-paraboloid mapping but I wasn't satisfying with the result. Then I decided to look into dynamic cube mapping and searched around the Internet for some hints.
To my disappointment, I didn't get many useful results. Luckily I found a DirectX sample called HDR Cube Mapping which implemented dynamic cube mapping, and it helped me a lot :D. So I decided to write this blog to show my take on dynamic cube mapping and also serve as a tutorial for who wants to achieve this technique.
What is a cube map?
So first let's look at what a cube map is. Here is the definition of a cube map from DirectX document (Click on the image to see larger version):

So after we get the definition of cube map down, let's talk about the use of cube map. You can use cube map to create skybox to envelope your game and create any atmospheric effects such as day / night time. One use of cube map is sample texture for any reflection / refraction object. However, one flaw of this technique is since the cube map is static, the reflection / refraction model won't reflect / refract any object that are not part of that cubemap.
To overcome this flaw, we will look into dynamic cube mapping. As the name suggest, a dynamic cube map is dynamic and store information of all objects in the scene. It changes as the objects in the scene change. To build a dynamic cube map, you will render the scene six times, each time into a face of the cube map. You can render images to the individual faces of the cube map just like you would any other texture or surface object.
The most important thing when render to a cube map face is setting the transformation view matrices so that the camera is positioned properly and points in the proper direction for that face: forward (+z), backward (-z), left (-x), right (+x), up (+y), and down (-y). Here is the setup code:
Notice here the angle of projection. Since we break the space around us into 6 faces, we will use a projection of 90 degrees or PI / 2 to cover each one.
Here we use a stencil buffer g_pDepthCube to help render into cube map faces. Move on to setup view matrix:
After the view and projection matrices have been set, we will render the scene into the cube map face. But to do so, we have to obtain a pointer that point to the surface of the cube map face and use it to render.
So that's the code for implementing dynamic cube mapping. Now let's look at the result, disadvantage and optimization.
Result:
 Video:
 YouTube link.
Disadvantage:
* Since there are sixe cube map faces, we have to render the scene six times every time. This can significantly slow down the frame rate of the application/gamese.
Optimization:
* There are ways to ensure that we don't have to render the scene six times every time. For example, we don't have to render into the face that the camera can't see.
* Use other technique such as dual-paraboloid mapping to achieve the same effect ( You can look at the right for GraphicRunner blog, he has an excellent tutorial on that ). However, dynamic cube mapping gives the best result compare to other techniques ( that's what I think :D ).
That's it folks. Hope you guys find this post helpful. If you have any questions or suggestions please let me know. Next I will try to implement a sun shader and crepuscular ray ( or God Ray ). Until next time, take care.
To my disappointment, I didn't get many useful results. Luckily I found a DirectX sample called HDR Cube Mapping which implemented dynamic cube mapping, and it helped me a lot :D. So I decided to write this blog to show my take on dynamic cube mapping and also serve as a tutorial for who wants to achieve this technique.
What is a cube map?
So first let's look at what a cube map is. Here is the definition of a cube map from DirectX document (Click on the image to see larger version):

So after we get the definition of cube map down, let's talk about the use of cube map. You can use cube map to create skybox to envelope your game and create any atmospheric effects such as day / night time. One use of cube map is sample texture for any reflection / refraction object. However, one flaw of this technique is since the cube map is static, the reflection / refraction model won't reflect / refract any object that are not part of that cubemap.
To overcome this flaw, we will look into dynamic cube mapping. As the name suggest, a dynamic cube map is dynamic and store information of all objects in the scene. It changes as the objects in the scene change. To build a dynamic cube map, you will render the scene six times, each time into a face of the cube map. You can render images to the individual faces of the cube map just like you would any other texture or surface object.
The most important thing when render to a cube map face is setting the transformation view matrices so that the camera is positioned properly and points in the proper direction for that face: forward (+z), backward (-z), left (-x), right (+x), up (+y), and down (-y). Here is the setup code:
void RenderIntoCubeMaps()
{
// Save the camera position
float xSave = gCamera->position().x;
float ySave = gCamera->position().y;
float zSave = gCamera->position().z;

// Set it to the reflection/refraction object position
// Here I put it at the origin (0, 0, 0)
gCamera->position().x = 0.0f;
gCamera->position().y = 0.0f;
gCamera->position().z = 0.0f;

// Prepare the projection matrix
D3DXMATRIX mProj;
D3DXMatrixPerspectiveFovLH(&mProj, D3DX_PI * 0.5f, 1.0f, 1.0f, 10000.0f);
Notice here the angle of projection. Since we break the space around us into 6 faces, we will use a projection of 90 degrees or PI / 2 to cover each one.
// Store the current back buffer and z-buffer
LPDIRECT3DSURFACE9 pBackBuffer = NULL;
LPDIRECT3DSURFACE9 pZBuffer      = NULL;
gd3dDevice->GetRenderTarget ( 0, &pBackBuffer );
if(SUCCEEDED( gd3dDevice->GetDepthStencilSurface( &pZBuffer ) ) )
gd3dDevice->SetDepthStencilSurface( g_pDepthCube );
Here we use a stencil buffer g_pDepthCube to help render into cube map faces. Move on to setup view matrix:
     for(DWORD nFace = 0; nFace < 6; nFace++)
     {
        // Standard view that will be overridden below
        D3DXVECTOR3 vEnvEyePt = D3DXVECTOR3(0.0f, 0.0f, 0.0f);
        D3DXVECTOR3 vLookatPt, vUpVec;

        switch(nFace)
        {
            case D3DCUBEMAP_FACE_POSITIVE_X:
                vLookatPt = D3DXVECTOR3(1.0f, 0.0f, 0.0f);
                vUpVec    = D3DXVECTOR3(0.0f, 1.0f, 0.0f);
                break;
            case D3DCUBEMAP_FACE_NEGATIVE_X:
                vLookatPt = D3DXVECTOR3(-1.0f, 0.0f, 0.0f);
                vUpVec    = D3DXVECTOR3( 0.0f, 1.0f, 0.0f);
                break;
            case D3DCUBEMAP_FACE_POSITIVE_Y:
                vLookatPt = D3DXVECTOR3(0.0f, 1.0f, 0.0f);
                vUpVec    = D3DXVECTOR3(0.0f, 0.0f,-1.0f);
                break;
            case D3DCUBEMAP_FACE_NEGATIVE_Y:
                vLookatPt = D3DXVECTOR3(0.0f,-1.0f, 0.0f);
                vUpVec    = D3DXVECTOR3(0.0f, 0.0f, 1.0f);
                break;
            case D3DCUBEMAP_FACE_POSITIVE_Z:
                vLookatPt = D3DXVECTOR3( 0.0f, 0.0f, 1.0f);
                vUpVec    = D3DXVECTOR3( 0.0f, 1.0f, 0.0f);
                break;
            case D3DCUBEMAP_FACE_NEGATIVE_Z:
                vLookatPt = D3DXVECTOR3(0.0f, 0.0f,-1.0f);
                vUpVec    = D3DXVECTOR3(0.0f, 1.0f, 0.0f);
                break;
        }

     D3DXMATRIX mView;
     D3DXMatrixLookAtLH( &mView, &vEnvEyePt, &vLookatPt, &vUpVec );
After the view and projection matrices have been set, we will render the scene into the cube map face. But to do so, we have to obtain a pointer that point to the surface of the cube map face and use it to render.
LPDIRECT3DSURFACE9 pSurf;
g_apCubeMap->GetCubeMapSurface((D3DCUBEMAP_FACES) nFace, 0, &pSurf));
gd3dDevice->SetRenderTarget (0, pSurf);      // Set the render target.
ReleaseCOM( pSurf );                         // Safely release the surface.

// Clear the z-buffer
gd3dDevice->Clear( 0L, NULL, D3DCLEAR_ZBUFFER, 0x000000ff, 1.0f, 0L) ;

gd3dDevice->BeginScene();

// render code here....

gd3dDevice->EndScene();

// We're done, so restore the camera position
gCamera->pos().x = xSave;
gCamera->pos().y = ySave;
gCamera->pos().z = zSave;

// Restore the depth-stencil buffer and render target
if( pZBuffer )
{
   gd3dDevice->SetDepthStencilSurface( pZBuffer );
   ReleaseCOM( pZBuffer );
}
gd3dDevice->SetRenderTarget( 0, pBackBuffer );
ReleaseCOM( pBackBuffer );
}
So that's the code for implementing dynamic cube mapping. Now let's look at the result, disadvantage and optimization.
Result:
 Video:
Disadvantage:
* Since there are sixe cube map faces, we have to render the scene six times every time. This can significantly slow down the frame rate of the application/gamese.
Optimization:
* There are ways to ensure that we don't have to render the scene six times every time. For example, we don't have to render into the face that the camera can't see.
* Use other technique such as dual-paraboloid mapping to achieve the same effect ( You can look at the right for GraphicRunner blog, he has an excellent tutorial on that ). However, dynamic cube mapping gives the best result compare to other techniques ( that's what I think :D ).
That's it folks. Hope you guys find this post helpful. If you have any questions or suggestions please let me know. Next I will try to implement a sun shader and crepuscular ray ( or God Ray ). Until next time, take care.
Subscribe to:
Posts (Atom)